Welcome to this guide about pfSense SSH configuration! This tutorial will walk you through enabling SSH on your pfSense, adding authorized keys, and securing your private key.
Table of Contents
About pfSense
pfSense, based on version CE 2.7.0, is a robust open-source firewall and routing software designed to provide security, reliability, and advanced features. One of its powerful capabilities is SSH access, allowing users to manage their firewall remotely with enhanced security measures.
Let’s Get Started
Step 1 – Enable SSH Access
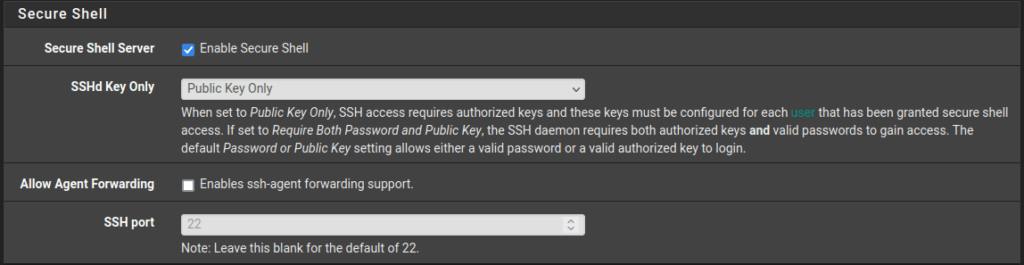
Navigate to System > Advanced > Admin Access. Then, under “Secure Shell”, click “Enable”, and select “Public Key Only” for the “SSHd Key Only” dropdown.
Configuring it to “Public Key Only” necessitates authorized keys, which you must set up for each user with secure shell access. Opting for “Require Both Password and Public Key” in the dropdown means the SSH daemon demands both authorized keys and valid passwords for access. The default setting of Password or Public Key permits logging in with either a valid password or an authorized key.
Screenshot:
Step 2 – Add Authorized SSH Keys
Now, let us add authorized SSH keys to your pfSense:
- In the pfSense web interface, go to “System” > “User Manager.”
- Edit the user that requires the SSH keys.
- Paste the public key from the newly generated key pair in the “Authorized Keys” field.
- Click the “Save” button to save the user configuration.
Remember to maintain the security of the private key on your client machine. This key is crucial for authentication when connecting to pfSense via SSH, while the public key on pfSense verifies the client’s identity.
How to generate SSH Keys
Run the ‘ssh-keygen’ command in your terminal:
ssh-keygen -t rsa -b 2048 -f /path/to/your/keyfileOnce the command completes, you will see a message indicating that the keys were generated. Subsequently, you can verify the keys in the specified location.
Your private key will reside in “/path/to/your/keyfile,” while the corresponding public key can be found in “/path/to/your/keyfile.pub.” Maintaining your private key’s security is crucial, ensuring that it remains confidential and is never shared. This private key is integral for authentication purposes. On the other hand, you can share your public key with the specific systems you intend to access using SSH. Consequently, you must add the public key to the authorized_keys file on the remote server.
Wrapping Up
Congratulations! You have successfully completed this guide about pfSense SSH configuration. If you have further questions or need additional assistance, please explore the pfSense community for ongoing support.
You May Also Be Interested In
For more information, visit the official pfSense SSH access guide.
As well as: