This post will show how you can define a custom PHP configuration for your website. A Custom PHP configuration will allow you to change server default configurations. This post mentions two options for adjusting configuration: user.ini and .htaccess.
The default server configuration (set using the php.ini file) will prevent your website from displaying errors. This setting in the php.ini is excellent in production environments but is cumbersome in a development environment.

What is the php.ini config file?
The php.ini file is a file that controls PHP settings on the server in the form of “directives”. PHP reads the php.ini file during startup and then configures the PHP environment accordingly. Some changes to the php.ini file will require a PHP restart.
It’s important to note that the php.ini affects the entire server and all the PHP sites hosted on it. Most hosting platforms will not allow you access to the php.ini.
Adjust the PHP configuration using the .htaccess file
Using the .htaccess file is an alternative method of setting PHP configuration. However, this method is not the preferred method for all PHP sites. You must use the .user.ini configuration file if your site is PHP 5.3.0+, and that is hosted using Apache GCI/FastCGI. Refer to the .htaccess-guide guide more information on configuring this file.
Adjust the PHP configruation using the . user.ini file
Instead of using the .htaccess file, set the PHP configuration within the .user.ini file. The .user.ini files are just like the .htaccess files, but there are some differences
For instance, setting the PHP memory limit in .htaccess would require the following entry: php_value memory_limit 256M.
The PHP memory limit configuration in the .htaccess will result in the following error:
.htaccess: Invalid command ‘php_value’, perhaps misspelt or defined by a module not included in the server configuration.
The error will be available in your Apache site logs. Apache store this error log (typically) in the following path: /var/log/apache2/. Alternatively, you would see a server 500 error.
Changing the old .htaccess configuration to .user.ini configuration is easy!
.htaccess configuration example:
php_value memory_limit 256M
php_value max_execution_time 300
.user.ini configuration example:
memory_limit 256M
max_execution_time = 300
The .user.ini file is configured on a per-directory basis and does not support all the php.ini directives.
Visit the list of php.ini directives page to see which directives apply to the .user.ini file. The configuration that applies to the .user.ini file will have a changeable mode value of “PHP_INI_PERDIR”.
There are about over 50 directives that can be set for the .user.ini file.
The php.ini file can change the requested filename of the user.ini file. The user_ini.filename directive can change the required name from .user.ini to something else. Be sure to check this configuration using a php.info script.
Changes to your .user.ini file may take some time to take effect. The user_ini.cache_ttl directive in the php.ini typically caches the .user.ini for 5 minutes at a time. It is possible for the server admin to disable the .user.ini file.
Create a .user.ini file for custom PHP configuration
You can create a .user.ini file, which contains the configuration you would enter for the php.ini file.
To set your custom php.ini configuration:
Copy the php.ini file and make the changes to the configuration. As an example – you could enable PHP to display errors on the website. Remember to refer to the list of php.ini directives. Only some PHP directive may be configurable within the .user.ini file.
Rename the php.ini file to .user.ini and upload it to your website. Note that the dot is important to add. Adding the dot will hide the file when viewing it via the Linux shell. Using “ls-a” will show this file if it magically “disappears”!
To test, upload the following info.php script to your website:
<?php
phpinfo();
?>
The phpinfo() method will display the configuration setting on your website.
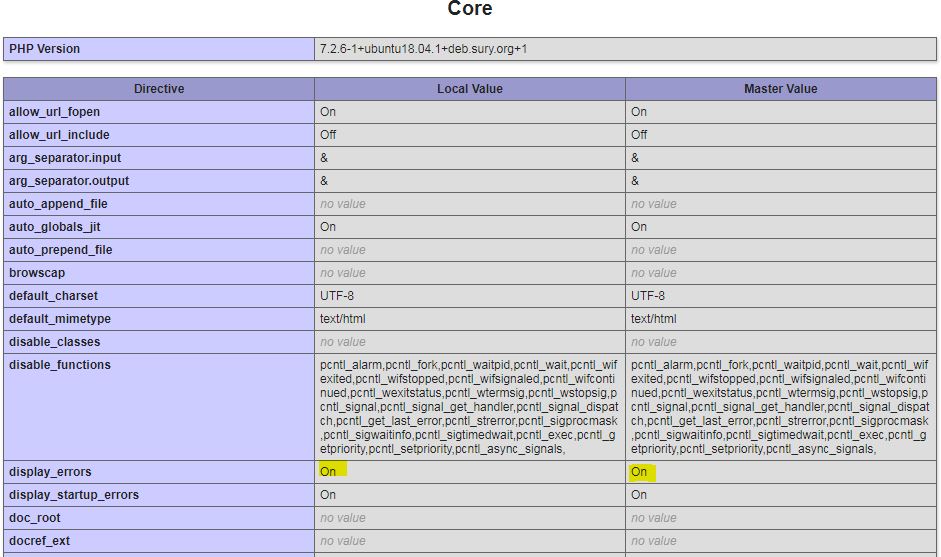
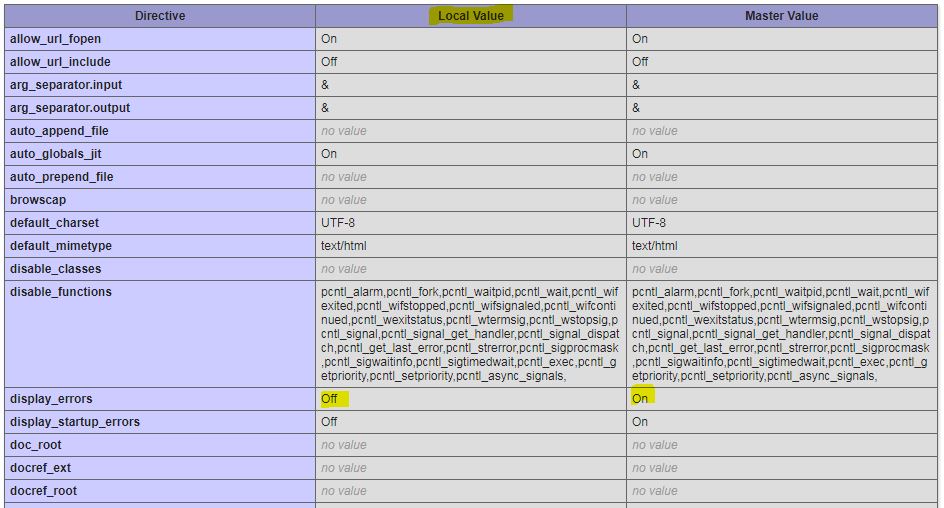
Look out for a section that looks similar to this image below, when you view your php.info page in the browser. Note the differences between the master and local value in terms of displaying errors.
After uploading the .user.ini file:
Before uploading the .user.ini file: