A Jenkins node agent is essentially a worker node that performs operations requested by Jenkins. Jenkins will manage the node agent as well as the required tools. This guide will show you how to create an agent node in Jenkins.
Table of Contents
Important concepts
Before we get started, let’s review some terminology related to nodes.
- Master – (Or controller node) This is is where Jenkins is installed.
- Agent – (Or node) This the machine where the controller node connects too to execute jobs.
- Executor – This is the service that runs on the node which executes the job on the node.
Networking-wise, the controller and node should be able to communicate with each other.
In addition:
- Both are required to have Java installed.
- The agent must provide a user account.
Launch methods
The controller communicates with the node using a specific launch method. These are:
Launch agents via SSH
This is supported by default on all Linux systems as well as macOS. You can also use this feature on Windows by installing OpenSSH.
Launch agent by connecting it to the master
This launch method is useful where agents are Windows-based. It is also useful when an agent is behind a firewall and unable to use SSH to connect. This method will require you to enable the incoming TCP port for Jenkins agents. See Jenkins: Basic security settings for information about this.
Launch agent via execution of command on the master
This launch method works much like the first but allows you to manually set up the agent node.
Lets get started!
Using the manage Jenkins menu, click on the manage Jenkins -> Manage Nodes and Clouds -> New Node.
Next, give the node a name. Then select a “permanent agent” if you plan the node to be permanently available to Jenkins to accept work.

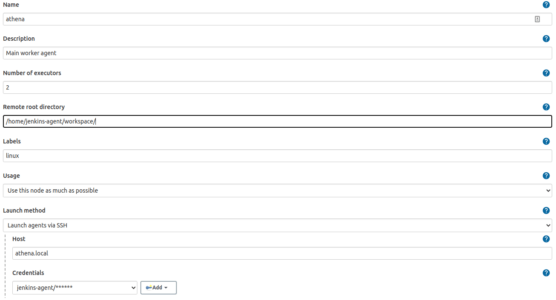
Then on the next screen, add the following details:
- Description – add any description that makes sense.
- Number of executors – This is typically one, but the agent node has many CPU cores then you can increase the number. The number of executors should be less than the number of CPU core on the agent node.
- Remote root directory – The directory in which the Jenkins agent should execute build jobs. Jenkins will create this directory on your behalf.
- Labels – This is information that helps define the agent. For example you could use words like: server1, linux docker, dedicated, etc…
- Usage – You can use this node as much as possible or only if a label matches.
- Launch method – You would typically select: “launch agents via SSH”.
- Host – Add the host name of the server.
- Credentials – Add the credentials for your host.
- Host key verification – The least secure and easiest option is “host key verification strategy”.

Finally, and click save.
Create a new Linux user on the agent node
You can create a new user and group on the agent node using the following command:
sudo useradd -s /bin/bash -d /home/jenkins-agent/ -m -G sudo jenkins-agent
sudo passwd jenkins-agent
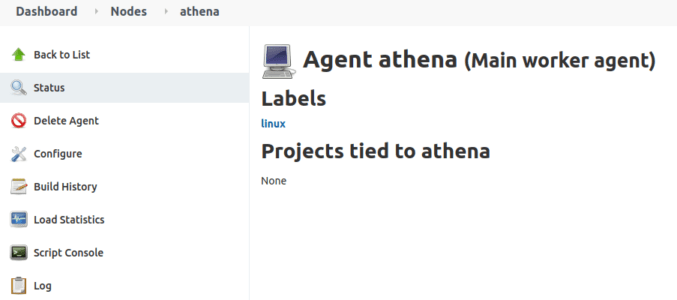
Verify the agent node is working
You can verify that the agent node is working by viewing the nodes dashboard:

You can also click on the node and then click log to the critical information:

Disable the controller node from running tasks
Its best practice to run jobs on agent nodes. The controller node should not run any jobs due to stability and security concerns. You can set the number of executors don’t eh “master” node to “0” to disable it.


