This post will teach you how you can code a WordPress plugin. First, we’ll start with a simple plugin to check posts for specific words and filter them. The next step will be to add a menu and integrate it with the plugin.
With over 7 million downloads for WordPress 5.3 alone, WordPress has become one of the most influential CMS of all time. Over 30% of the websites on the internet run on WordPress. The success of WordPress is due to the thousands of developers who work day and night to improve WordPress. WordPress is most famous for its over 55,000 plugins. Some powerful plugins include woo-commerce, Elementor, BuddyPress, LearnPress, Yoast SEO. As a result, WordPress has become a platform for online shopping, learning, socializing, and much more.

Table of Contents
Code a WordPress plugin
Making a WordPress plugin is much easier than one might think. A plugin can be straightforward, like Hello Dolly. However, a plugin can also be quite powerful, like BuddyPress.
Plugins can sometimes get very complex and have unique file structures. But all plugins begin with only one file. In this tutorial, you will start with a one-file plugin and move towards a small file structure. The name of this plugin will be “WP Post Word Filter”.
Make the plugin file
Your WordPress plugin’s code will be stored in the following folder: /wp-content/plugin/. So the first step you need to do is create an empty PHP file and place it in the plugins folder. Let’s call it wp-post-word-filter.php.
Now add the following code to your file:
<?php
/**
* Plugin Name: WP Post Word Filter
* Plugin URI: https://www.link-to-plugin-website.com/link-to-plugin
* Description: This description appears on the plugins page on admin panel.
* Version: 1.0
* Author: John Doe
* Author URI: http://link-to-your-site-or-blog.com/
**/
The above code tells WordPress about our plugin. You can find the results of the above by navigating to the plugins page from the admin menu. You will find the following in the plugins list. Go ahead and activate the plugin.

You can also go to add new > upload plugin from the plugins page and upload the file. WordPress will place the file in the correct directory by itself. It is good practice to put all your plugin files in a folder. You can then zip the folder and upload the plugin.
And just like that, you have your first plugin! By now, You might be thinking, this is a very useless plugin!. Well, you would be correct. This is the most basic form of a WordPress plugin. Let’s extend the plugin so that it can read and modify posts.
Code Hooks in your plugin: WordPress Actions and Filters
WordPress has a functionality called “Hooks”. Hooks allow you to add your custom functions to WordPress components. These functions can be executed on specific points in the loading of your website. They can also manipulate the data being displayed. There are two types of hooks in WordPress, Actions, and Filters.
Actions are used to execute your custom function at specific points in execution. Filters take in data like post content, menu links, tags list and manipulate that data before returning it.
Creating an options page
Let’s look at how to make menus. We can use add_action() function built into WordPress to add a new options page. The function has two parameters: The first parameter is the name of the action tag like “admin_init” or “wp_loaded”. The second parameter is the function to execute when the action is called. You can find more information about the function here.
To create a WordPress menu page, we will use the ”admin_menu” and ”admin_init” action tags.
add_action('admin_menu', 'wp_post_filter_init');
add_action('admin_init', 'wp_post_filter_register_settings');
In the above, post_filter_init and post_filter_register_settings are functions to execute when the actions are called. So let’s go ahead and make those functions as well:
function wp_post_filter_init(){
    //create new top-level menu
    add_menu_page('WP Post filter', 'WP Post filter', 'administrator', 'post-filter-option', 'wp_post_filter_options');
}

function wp_post_filter_register_settings(){
    // Registering options for our plugin
    register_setting( 'post-filter-option', 'wp_filter_words' );
}
In the above code:
- post_filter_init() adds the menu option to the admin panel sidebar.
- wp_post_filter_register_settings() registers the option value we will be using later on.
- add_menu_page() and register_setting() are built in WordPress functions.
Unfortunately, the details of the menus are beyond the scope of this post. You can visit the WordPress documentation to read more about add_menu_page() and register_setting().

One of the arguments passed into add_menu_page is ’wp_post_filter_options’. This is the callback function to use when displaying the options page. Let’s make that as well.
function wp_post_filter_options() {
?>
	<div class="wrap">
	<h1>WP Post Filter Plugin</h1>

	<form method="post" action="options.php">
	    <?php settings_fields( 'post-filter-option' );?>
	    <?php do_settings_sections( 'post-filter-option' );?>

	    <h3>Enter words to filter: (one per line)</h3>

		<textarea name="wp_filter_words" rows='5' cols='60'><?php echo esc_attr( get_option('wp_filter_words') );?></textarea>

	    <?php submit_button();?>
	</form>
	</div>
<?php } ?>
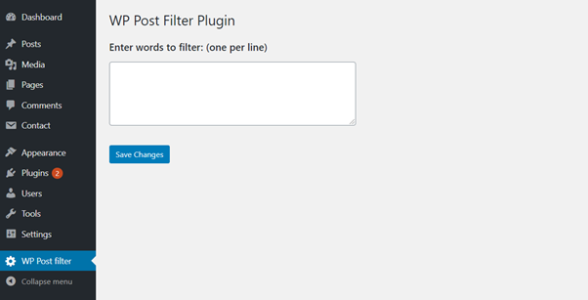
Here, wp_post_filter_options() displays the simple form. Functions like settings_fields() and do_settings_sections() are WordPress native functions as part of the Settings API. They are used to make the WordPress admin panel more secure. If you’re interested, you can learn more about it here.
This completes a basic setup. Next, let’s use the stored settings to filter some words from our posts.
Removing words from posts
You can use WordPress filters to remove words. We will use built-in WordPress function add_filter(). It performs very similarly to add_action. The difference is the function you pass in add_filter will have one $data parameter. Let’s use the filter on the_content hook. You can read more about filters here.
add_filter('the_content', 'wp_post_filter');

function wp_post_filter($data){
	$words = explode( "\n", get_option('wp_filter_words') );
	$data = str_replace($word, "*****", $data);

	return $data;
}
This was the final piece of the puzzle. You now have a plugin that filters words from a post.
Wrapping up
This was only scratching the surface of the world of WordPress plugins. WordPress Plugins can be quite powerful! Here are a few more references to get you to start with WordPress plugins:
- WordPress plugins homepage
- WordPress plugin developers handbook
- About WordPress hooks
- Complete actions reference
- Complete filters reference
- add_action()
- add_filter()
- WordPress settings reference
- WordPress custom menu tutorial
We hope this post helps you create some awesome plugins! Complete code for the plugin:
<?php
/**
* Plugin Name: WP Post Word Filter
* Plugin URI: https://www.link-to-plugin-website.com/link-to-plugin
* Description: This description appears on the plugins page on admin panel.
* Version: 1.0
* Author: John Doe
* Author URI: http://link-to-your-site-or-blog.com/
**/

add_action('admin_menu', 'wp_post_filter_init');
add_action('admin_init', 'wp_post_filter_register_settings' );

function wp_post_filter_init(){
    //create new top-level menu
    add_menu_page('WP Post filter', 'WP Post filter', 'administrator', 'post-filter-option', 'wp_post_filter_options');
}

function wp_post_filter_register_settings(){
    // Registering options for our plugin
    register_setting( 'post-filter-option', 'wp_filter_words' );
}

function wp_post_filter_options() {
?>
	<div class="wrap">
	<h1>WP Post Filter Plugin</h1>

	<form method="post" action="options.php">
	    <?php settings_fields( 'post-filter-option' );?>
	    <?php do_settings_sections( 'post-filter-option' );?>

	    <h3>Enter words to filter: (one per line)</h3>
		  <textarea name="wp_filter_words" rows='5' cols='60'><?php echo esc_attr( get_option('wp_filter_words') );?></textarea>
	    <?php submit_button();?>
	</form>
	</div>
<?php
}

add_filter('the_content', 'wp_post_filter');

function wp_post_filter($data){
	$words = explode( "\n", get_option('wp_filter_words') );
	$data = str_replace($word, "*****", $data);

	return $data;
}