So you are thinking about using WordPress. Congratulations! You are in good company. WordPress powers over 25% of the entire web and holds almost 60% of the global market share for content management systems. With WordPress powering such an important part of your business, it needs to be stable and secure. Below, we’ll outline a series of best practices that any serious WordPress installation should include. This covers the WordPress software itself, associated plugins you’ll need, and the Linux host that your WordPress installation lives on.

Consider fully hosted solutions
Before getting too deep into the nitty-gritty of securing WordPress, we should take some time to discuss the benefits of a hosted WordPress solution. Every second spent working on your WordPress site is one not spent on other areas of your business. Some individuals and companies do lucrative business from exclusively managing WordPress and Linux, and for a good reason!
You regularly have new WordPress core and plugin vulnerabilities that need patching, backups to be made, and content caching to configure. Linux has these care and feeding tasks, too, with some vulnerabilities being remotely exploitable and requiring no listening services to be exploited. Yikes! This gets even more complicated when upgrading between major WordPress or Linux releases, which means site downtime if you have not configured a high availability setup. Hosted WordPress allows you to outsource all of this work to an expert team for a fraction of the cost of hiring someone in-house to do these tasks.
However, this should not discourage you from attempting to learn how to secure your WordPress install. WordPress is such a broadly-used piece of software, and it isn’t impossible to build the expertise needed to do this yourself. So, if you are still interested in running your WordPress, continue reading for a series of tasks that will help secure your WordPress installation and Linux host.
Table of Contents
WordPress Tasks
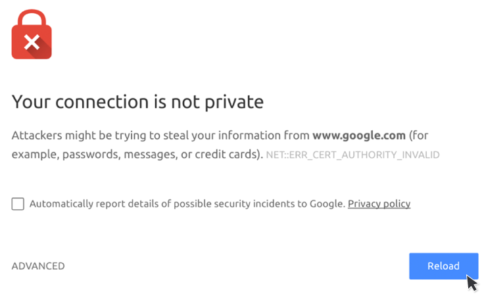
Get a SSL Certificate
SSL Certificates encrypt the data between the client and the server making the communication unreadable to anyone else. In so doing, it protects information from being stolen and used by hackers. Other than security, browsers penalize HTTP sites by warning the visitors that the connection is not private. It’s, therefore, an excellent idea to get an SSL certificate!
Most people can use Let’s Encrypt to get a free SSL Certificate. Let’s Encrypt is a nonprofit Certificate Authority providing TLS certificates to 225 million websites. Most hosts also offer free SSL certificates, or you can go down the paid certificate path if you need to.
Limit access to wp-admin and wp-login
Allowed lists tell your server to block all traffic except for the specified IP addresses. You can use Allowed lists to only allow specific IPs to your WordPress site-sensitive areas (like wp-admin and wp-login). Be aware, however, that you should only use this option if you have a static IP.
Add the following to your .htaccess file to deny access to your wp-admin and wp-login.php:
RewriteEngine on
RewriteCond %{REQUEST_URI} ^(.*)?wp-login\.php(.*)$ [OR]
RewriteCond %{REQUEST_URI} ^(.*)?wp-admin$
RewriteCond %{REMOTE_ADDR} !^220\.220\.220\.220$
RewriteRule ^(.*)$ - [R=403,L]
Disallow file editing
WordPress gives you the ability to edit the theme and plugin files directly from within WordPress. There is no need to have this feature enabled if you never (or seldom) need it.
You can disallow file editing by adding the following line to your wp-config.php file:
define( 'DISALLOW_FILE_EDIT', true );Disable directory listing with .htaccess
Hackers can use directory listing to find files with known vulnerabilities. Also, it exposes your data and allows people to copy images and other information.
You turn off directory indexing and browsing by adding the following to your .htaccess file in the root directory.
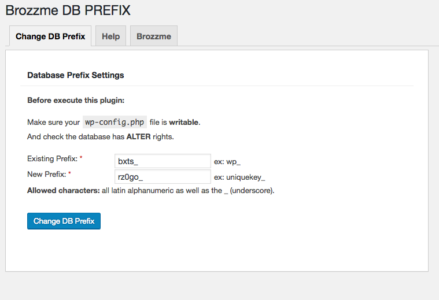
Options -IndexesChange the default database prefix
WordPress automatically creates a database with its default table prefix “wp_”. Changing the table prefix will reduce your WordPress from being impacted by a “SQL injection” (mostly) due to a vulnerable or hacked plugin. But, of course, if a hacker can do this, you should be considered more than a “SQL injection”.
You can use the Brozzme DB Prefix plugin to modify your database prefix everywhere (database and wp-config.php).
Remove your the version number
The WordPress version number can tell a hacker which vulnerabilities your WordPress install has. WordPress adds the version number in several places: in your WordPress dashboard, in the header, RSS feed, CSS, and scripts.
You can easily remove the WordPress version number by using the “Remove WordPress Version Number” plugin.
Perform regular security scans
Improving website security starts with proper reconnaissance! Use a web-based scanner like https://www.malcare.com/ for auditing your WordPress site’s publicly-facing view that the attacker sees. Run this scan daily to keep you and your customers safe. Security scanning is an essential part of how to secure WordPress!

Core and Plugin Updates
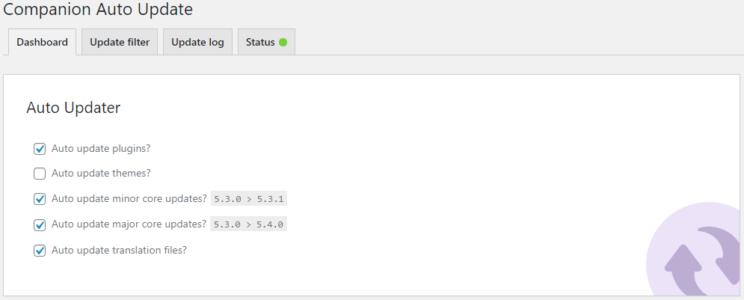
WordPress releases updates and security fixes throughout the year, and your WordPress installation should install these automatically. Follow the WordPress Announcements mailing list to keep an eye on upgrades as they are shipped out. Plugins can also be auto-upgraded, a massive time-saver as plugins can ship updates weekly or even multiple times a week.
Auto-update using the functions.php
This can be done via your theme’s functions.php file with the following:
add_filter( 'auto_update_plugin', '__return_true' );Auto-update using a plugin
You can also use an automatic updates plugin like Companion Auto Update to perform the same functionality. Though core and plugin updates are quite reliable, there is always the chance that these automatic updates can cause issues. Some automatic updates plugins allow you to pick and choose which plugins to upgrade automatically. Risky ones, like plugins for e-commerce, you can update personally. Either way, you should have comprehensive site backups if anything goes awry.
Delete inactive plugins
We all end up with cruft laying around when using WordPress, but did you know you can still get hacked by inactive plugins? So make sure to audit and delete inactive plugins that you know you won’t be using again.
Backups
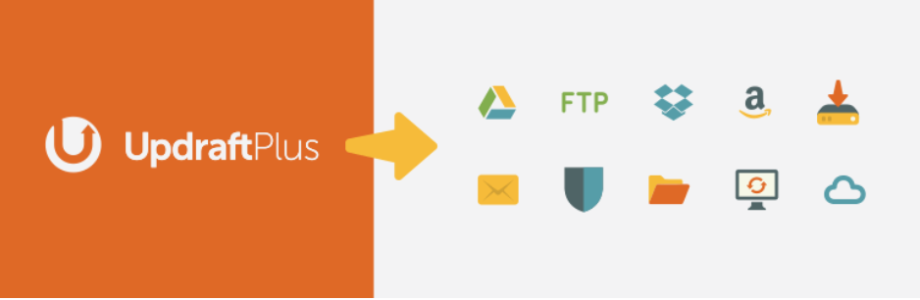
Backups protect against a wide range of failure scenarios. For example, a good backup can help you quickly recover from a site compromise, restore accidentally deleted files, and ensure that the loss of your Linux box doesn’t result in losing your entire website. To leverage these benefits, use a plugin that offers automatic, incremental backups like Updraft Plus.
Access Control
Of course, preventing unwanted access to the administrative portal is one of the most critical parts of securing a WordPress installation. Anyone who has looked at web server logs sees automated bots trying to access /wp-login.php and /wp-admin.
Once they get access to a login page, these bots will automatically attempt various username and password combinations. Hackers source these credentials from other compromised websites around the web.
- Move your WordPress login to a different location, ideally a pseudorandom string. This makes it much more difficult for bots to find.
- Change the default admin username to a pseudorandomly generated username. This makes it twice as hard for bots to brute force. Though we spend a lot of time securing our passwords, usernames are just as vital! By using a pseudorandomly generated username, you make it much harder for attackers to brute-force. Usernames like admin, your website name, or your first name are straightforward to guess!
- The success of brute-forcing is directly proportional to the number of login attempts a bot can make. There, use a login attempt rate-limiting plugin to block users making repeated login attempts automatically.
- Enable two-factor authentication on all accounts. By requiring an app, hardware device, or SMS two-factor authentication code for all logins, brute-forcing becomes almost impossible.
- By far, employee negligence is the leading cause of data breaches. Therefore, regularly audit your configured users and delete anyone who doesn’t need access or give people less access if they have permissions they don’t need.
Disable XML-RPC
XML-RPC is a well-known vector for attackers to compromise WordPress installations. Thankfully, an easy-to-use plugin called “Disable XML-RPC” does what it says on the tin! It is the most straightforward security win of your day on how to secure WordPress.
Audit users and roles
Make sure to audit your WordPress users and user roles at least once a month! WordPress offers six different user roles. Follow the principle of least privilege and only give folks the permissions they need to do their job.
Firewall
If someone can’t access your site, they can’t compromise it. This seemingly simple idea is quite challenging to implement in practice. After all, how do you know who the bad guys are? However, tools like the Sucuri WordPress WAF can offer this sort of protection. Their service will assist with automatically protecting sensitive pages, using IP address whitelisting to keep the hackers off your admin pages, and even leveraging machine learning to identify emerging threats.
Check for Google blacklisting
If you do get breached, securing your server is only part of the remediation. In addition, you might be on Google’s blocklist, which can be devastating if you have an e-commerce site. Use https://search.google.com/search-console/ and https://transparencyreport.google.com/safebrowsing/overview to see if you are blocked.
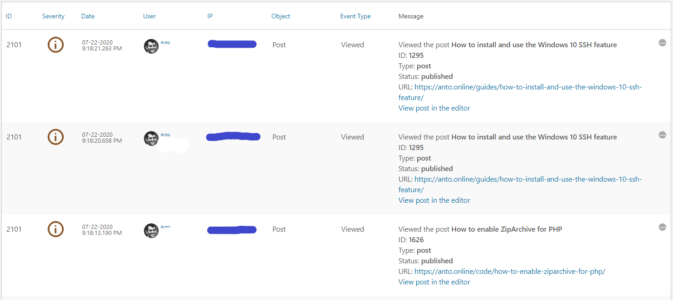
Check your logs for nefarious behavior
If you aren’t checking your logs, how will you know if the bad guys got in? Regularly audit your WordPress logs for abnormal behavior like frequently hitting non-existent pages or frequent login attempts. Tools like https://www.wpsecurityauditlog.com/ can significantly speed up an audit.
Backend Tasks
Automatic Updates
Just like WordPress core and plugins should have automatic updates turned on, so should your Linux machine. On Ubuntu, you can do this with the unattended upgrades package. On Fedora and CentOS, you can use the dnf-automatic or yumcron packages, depending on what operating system release version you are running.
Some vulnerabilities don’t require a listening service to be exploited. However, these are in the minority. Most exploited vulnerabilities require a listening service that hackers can access. Therefore, use a oneliner like netstat -antp to review what services are listening to on your server.
If you don’t want to control this at a host level, many hosting providers have an easy-to-use interface for configuring firewalls in front of your server. Digital Ocean‘s cloud firewall and AWS‘s security groups are one of the most convenient options around.
Put your WordPress files on a noexec mountpoint
By having your WordPress files on their own mount point, you can use noexec to prevent the execution of any binaries from this mount! This means that even if someone uploads a malicious PHP file disguised as a JPEG they won’t launch it. This is a pro-tip on how to secure WordPress!
Disable unneeded services
You cannot hack a disabled service. So why leave a bunch of daemons sitting around on your server? Instead, look at “netstat -antp” on your Linux host and make sure you disable any listening services you do not need.
root@server:/# netstat -antp
Active Internet connections (servers and established)
Proto Recv-Q Send-Q Local Address           Foreign Address         State       PID/Program name
tcp        0      0 172.22.0.1:38599        0.0.0.0:*               LISTEN      13356/rygel
tcp        0      0 172.17.0.1:34503        0.0.0.0:*               LISTEN      13356/rygel
tcp        0      0 172.20.0.1:33705        0.0.0.0:*               LISTEN      13356/rygel
tcp        0      0 127.0.0.1:33929         0.0.0.0:*               LISTEN      13356/rygel
tcp        0      0 0.0.0.0:5900            0.0.0.0:*               LISTEN      13355/vino-server
tcp        0      0 172.18.0.1:46415        0.0.0.0:*               LISTEN      13356/rygel
Use configuration management
Security frameworks consider configuration management as a concern, and for a good reason! The ability to audit the existing state of a server, enforce a given state, or redeploy to a new server is vital. So make sure to document configurations where you can, or use a tool like Ansible.
Use infrastructure as code tools like Terraform
Now that you’ve put all your server configurations into Ansible, why not manage the infrastructure itself as code? Tools like Terraform and Pulumi allow you to automate down to the bare metal provisioning. A whole data center in git? How cool is that?!

Configure a WAF and host firewall
A hacker can’t exploit your server if they can’t connect to it. The combination of a WordPress firewall and Linux firewall keeps both your website and server safe. So keep baddies out and do a regular audit on your connection logs.
Harden SSH
SSH is very secure by default, but you can always make it more secure! First, review your /etc/ssh/sshd_config to identify easy improvements like disallowing root login over ssh, changing the default port number, or disabling logins with username and password in favor of SSH keys.
Enable selinux
If you are running Red Hat, CentOS, or Fedora on your server, make Dan Walsh happy and ensure that you have SELinux running. For Ubuntu, make sure your AppArmor profiles are up to date and enforcing. Every layer of security is one more layer of protection against the bad guys.
Separate different network services to different VMs
Running multiple network services on a Linux box increases the attack surface of that machine and the blast radius of a breach. Separate your mail, Apache, and MySQL servers into separate virtual machines to minimize the impact of a breach. This is a vital tip on how to secure WordPress!
Double check your colocation provider security
When renting colocation space in a data center, make sure to request a copy of their security controls. This is because the building and server racks must use separate layers of access control. Physical access to a server is a dangerous thing!
Wrapping up
You will end up with a hardened, reliable WordPress installation when you complete how to secure WordPress guide. However, there is a wide range of additional improvements you can make! Keep up with developments in the information security and WordPress administration space so that you can continue to improve your site security.


great article!