Let’s look at how to install NextCloud using Wasabi S3 as primary storage.
This post assumes that you have some experience with Docker and setting up NextCloud. Therefore, we will not discuss configuring proxies, HTTPS, and more. Instead, we will explore how you can set up a fresh NextCloud base install with Wasabi as the S3 primary storage on Docker. You can then follow your own steps to customize your NextCloud install further as needed. Read our how-to setup Docker guide if you need some help.

What is NextCloud?

NextCloud allows you to share files in a similar way to Dropbox and Google Drive. NextCloud is, however, more than a file share! You can use it as a collaboration platform and customize it with a wide selection of useful apps.
What is Wasabi?
Wasabi Hot Cloud Storage is an S3-compliant object store that offers an infinite amount of data affordably at about 80% less than Amazon Web Services (AWS) S3. Additionally, Wasabi does not charge for egress or API requests – meaning you don’t pay to access your data.
Why use NextCloud with Wasabi?
NextCloud can use a block store or an S3-compliant object store as primary storage.
Block storage is great for performance but can be costly. S3 object storage, on the other hand, is slower but is optimized for a lower cost per GB. There are many object storage providers out there. AWS S3 is the more costly one. Backblaze B2, another provider, is less expensive, but their service was not fully S3 compliant when writing this post.
Using Wasabi as the primary S3 object store will provide you with cheap, enterprise-grade, infinite data with 11x9s data durability.
Before we get started
You will need to sign up for a Wasabi account at https://wasabi.com/. Note that Wasabi does not accept signups from Gmail and alike.
You will need a Linux host that has ample bandwidth available. The more files you have, the more data you will use. Also, your instance must have space available to allow uploads to be stored temporarily. This guide will use Ubuntu 18-04+.
You will need to have access to a database server such as MySQL. NextCloud uses the database to store metadata that is required to reconstruct the file and folder structure of the data. You will be in serious trouble if something happens to the database.
Notes about your NextCloud database
You will lose all your files if something goes wrong with your NextCloud database when using S3 as the default storage. Consider using a managed database such as AWS RDS if you are not 100% confident in your database management capability. AWS RDS provides automated backups and makes database recovery easy. AWS RDS also offers high availability and the ability to upgrade when needed.
Also, consider that NextCloud uses many database threads when a user previews images in the photo gallery. Therefore, you need to size your thread requirements well and ensure you have more than one CPU core assigned to the database.
Setup your NextCloud Wasabi bucket
Login to your Wasabi account and create your NextCloud Wasabi bucket.
You will need to:
- Set a bucket name.
- Choose a region that is close to your NextCloud instance.
- Select the ‘suspend versioning’ property
- Select the ‘suspend logging’ property
Create your NextCloud Wasabi bucket user
Create a NextCloud Wasabi bucket API user.
You will need to:
- Set a username
- Select the ‘programmatic access’ option.
- Create a group for the user to belong too.
- Give the user appropriate read and write permissions.
Remember to save the ‘Access Key’ and ‘Secret Key’. You will not be able to retrieve your secret key again.
Create your NextCloud MySQL database
Create your NextCloud MySQL database and database user.
You can use the following sample SQL script:
CREATE USER 'nxtcld-usr'@'%' IDENTIFIED BY 'my-password';
CREATE DATABASE IF NOT EXISTS nxtcld_db CHARACTER SET utf8mb4 COLLATE utf8mb4_general_ci;
GRANT ALL PRIVILEGES on nxtcld_db.* to 'nxtcld-usr'@'%';
FLUSH privileges;
You will need to change the database name, user, and password to your preference.
Setup Docker on your Ubuntu host
First, update your existing list of packages:
sudo apt updateNext, install Docker:
sudo apt install docker.ioNext, install Docker Compose:
sudo apt install docker-composeFinally, setup the Docker service to run at start-up:
sudo systemctl start docker
sudo systemctl enable docker
You can run ‘sudo docker –version’ to see if Docker installed successfully.
Setup Portainer to make Docker a breeze
Portainer is a lightweight web user interface that allows you to manage your Docker host and containers easily. However, you don’t need to use Portainer if you are a proficient Docker user.
Create a Portainer volume:
sudo docker volume create portainer_dataSetup the Portainer container:
sudo docker run -d -p 8000:8000 -p 9000:9000 --name portainer --restart always -v /var/run/docker.sock:/var/run/docker.sock -v portainer_data:/data portainer/portainerYou should now be able to access Portainer via the browser on http://YourLinuxHost:9000. Note Portainer will ask you to set up an admin username and password for the Linux host.
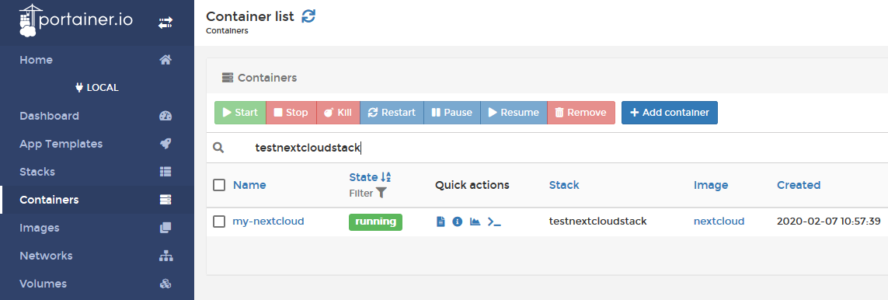
Use Portainer to create your NextCloud stack
Create a NextCloud stack using the following:
version: '2'

 services:
   my-nextcloud:
     container_name: my-nextcloud
     image: nextcloud
     ports:
      - 8080:80
     volumes:
      - /containers/my-nextcloud-apps:/var/www/html/apps
      - /containers/my-nextcloud-config:/var/www/html/config
      - /containers/my-nextcloud-data:/var/www/html/data
     restart: always
Configure the S3 primary store for your NextCloud instance
You must complete this before installing NextCloud. This shows you how you can install NextCloud using Wasabi S3 as primary storage on Docker
Open the ‘/containers/my-nextcloud-config‘ folder on your Linux host and create a file named: storage.config.php.
Add the following info into the storage.config.php file:
<?php
$CONFIG = array (
'objectstore' => array(
        'class' => '\\OC\\Files\\ObjectStore\\S3',
        'arguments' => array(
                'bucket' => 'my-nextcloud-bucket',
                'autocreate' => true,
                'key'    => 'BYQLD4LZGEXAMPLE',
                'secret' => 'dycOcoq6R9YwTVEXAMPLE',
                'hostname' => 's3.us-west-1.wasabisys.com',
                'region' => 'us-west-1',
                'port' => 443,
                'use_ssl' => true,
                'use_path_style'=>true
        ),
),
);
You will need to change the bucket name, hostname, region, key, and secret to your configuration.
You can use any one of the following Wasabi service URLs that matched your bucket configuration:
- Wasabi US East 1 (N. Virginia): s3.wasabisys.com or s3.us-east-1.wasabisys.com
- Wasabi US East 2 (N. Virginia): s3.us-east-2.wasabisys.com
- Wasabi US West 1 (Oregon): s3.us-west-1.wasabisys.com
- Wasabi EU Central 1 (Amsterdam): s3.eu-central-1.wasabisys.com
Finally, make sure that the storage.config.php file has 644 permissions and is owned by the www-data user.
Open your browser and open http://YourLinuxHost:8080. You should be able to see the NextCloud setup page that looks something like this:
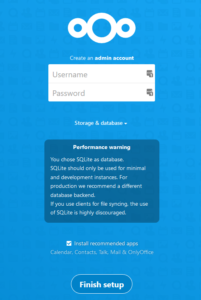
You will need to:
- Enter a NextCloud admin user and password
- Select ‘storage and database’
- Keep the data folder value as: /var/www/html/data
- Set the database type to ‘MySQL/MariaDB’
- Enter your database user, password and database name.
- Set the database host and port. Example: your-db.host.com:3306.
- Keep the default setting to install the default apps.
The install will take some time. Do not reload the page and wait for the following page to load:
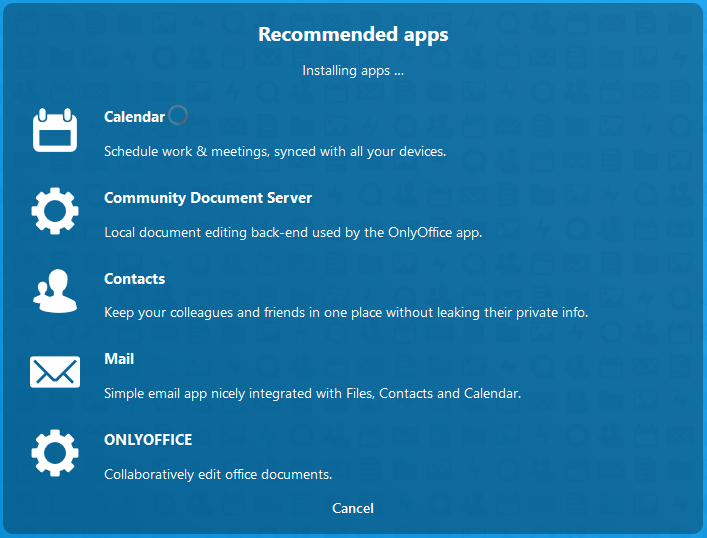
This step will take a few minutes to complete.
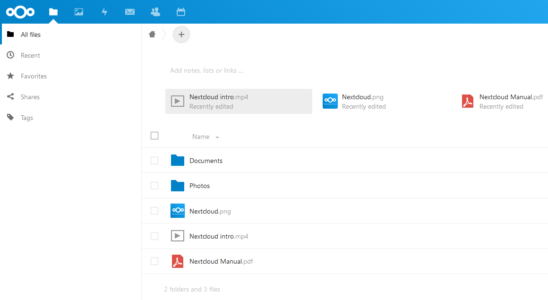
NextCloud will load the following page once the installation is complete:
Your NextCloud Wasabi S3 Primary store will contain objects similar to this:

Once you have confirmed that NextCloud is installed and that NextCloud uses Wasabi as the S3 primary store: Navigate to the ‘/containers/my-nextcloud-config‘ folder on your Linux host and edit the ‘config.php’ file.
Change the last line from:
);To:
'filelocking.enabled' => false,
 );
Next steps
Your NextCloud is now configured to use Wasabi as the S3 primary store. But, you may notice a performance issue.
The performance of NextCloud will be heavily dependent on:
- The number of cores and total memory available for the NextCloud application and database server. My preference is to provide no less than 2 cores and 2 Gb of RAM.
- The speed of your network between NextCloud, the database and Wasabi. Your network performance should not be a problem if your NextCloud application and database server is in the Cloud. Most Cloud providers offer (at minimum) Gigabit networks with premium connectivity.
- The availability of a Redis cache server. Redis is essential and will significantly improve NextCloud’s performance. Redis will also help reduce the number of queries to the database.
- You using the ‘Preview Generator’ app in NextCloud and pre-generating image thumbnails.
All around, NextCloud works well, and the performance is quite good once the install is complete.
Let me know how your NextCloud install went, and feel free to provide tips for other users.
Common Issues
Missing icons and Content Security Policy Violations (CSP)
You may experience this issue due to misconfiguration. MaFirst, makeure your config file contains the following lines where ‘nc-01.yourdomain.com’ should be your domain:
...
  'trusted_domains' =>
  array (
    0 => 'nc-01.yourdomain.com:8080',
    1 => 'nc-01.yourdomain.com',
  ),
  'overwriteprotocol' => 'https',
  'overwrite.cli.url' => 'https://nc-01.yourdomain.com',
...
Hiding index.php in URL
You should not see an ‘index.php’ in the URLs of NextCloud. For example: ‘https://my-nexctloud.site/index.php/login’, should be ‘https://my-nexctloud.site/login’.
You can remove the index.php by adding the following line to the NextCloud config:
'htaccess.RewriteBase' => '/',And then run the following OCC command:
php occ maintenance:update:htaccessNextCloud log capturing reverse proxy ip and not forward ip
Add the following into the config file to receive the forward IP in the NextCloud log:
...
  'forwarded_for_headers' => array('HTTP_X_FORWARDED_FOR'),
...
Example Files
Reverse Proxy Config (NGINX)
Here is an example of the reverse proxy used by NGINX:
server {
        listen        80;

        server_name   nc-01.yourdomain.com;

        return 301 https://nc-01.yourdomain.com$request_uri;
}

server {
        listen 443 ssl http2;
        listen [::]:443 ssl http2;

        server_name   nc-01.yourdomain.com;

        #ssl conf - remove v1, v1.1 for greater security
        ssl_protocols               TLSv1 TLSv1.1 TLSv1.2;
        ssl_ecdh_curve              secp384r1;
        ssl_ciphers                 "ECDHE-RSA-AES256-GCM-SHA512:DHE-RSA-AES256-GCM-SHA512:ECDHE-RSA-AES256-GCM-SHA384";
        ssl_prefer_server_ciphers   on;
        ssl_dhparam                 /etc/nginx/dhparams.pem;
        ssl_certificate             /nc-01-ssl/etc/letsencrypt/live/yourdomain.com/fullchain.pem;
        ssl_certificate_key         /nc-01-ssl/etc/letsencrypt/live/yourdomain.com/privkey.pem;
        ssl_session_timeout         10m;
        ssl_session_cache           shared:SSL:10m;
        ssl_session_tickets         off;
        ssl_stapling                on;
        ssl_stapling_verify         on;

        # Add headers to serve security related headers
        # Before enabling Strict-Transport-Security headers please read into this
        # topic first.
        add_header Strict-Transport-Security "max-age=15768000; includeSubDomains; preload;" always;
        #
        # WARNING: Only add the preload option once you read about
        # the consequences in https://hstspreload.org/. This option
        # will add the domain to a hardcoded list that is shipped
        # in all major browsers and getting removed from this list
        # could take several months.

        #security headers
        add_header Content-Security-Policy "default-src 'self'; script-src 'self' 'unsafe-inline'; img-src 'self' data:; style-src 'self'  'unsafe-inline'; font-src 'self' data:; worker-src 'self' ; object-src 'none'; base-uri 'self'; frame-ancestors 'self'; form-action 'self';";
        add_header X-Content-Type-Options nosniff;
        add_header X-Frame-Options "SAMEORIGIN";
        add_header X-XSS-Protection "1; mode=block" always;
        add_header Feature-Policy "geolocation none;midi none;notifications none;push none;sync-xhr none;microphone none;camera none;magnetometer none;gyroscope none;speaker self;vibrate none;fullscreen self;payment none;";
        server_tokens off;
        fastcgi_hide_header X-Powered-By;

        location = /robots.txt {
                allow all;
                log_not_found off;
                access_log off;
        }
        location = /.well-known/carddav {
                return 301 $scheme://$host:$server_port/remote.php/dav;
        }
        location = /.well-known/caldav {
                return 301 $scheme://$host:$server_port/remote.php/dav;
        }

        # set max upload size
        client_max_body_size 512M;
        fastcgi_buffers 64 4K;

        # Enable gzip
        gzip on;
        gzip_vary on;
        gzip_comp_level 4;
        gzip_min_length 256;
        gzip_proxied expired no-cache no-store private no_last_modified no_etag auth;
        #https://github.com/h5bp/server-configs-nginx/blob/master/mime.types
        gzip_types application/atom+xml application/javascript application/json application/ld+json application/manifest+json application/rss+xml application/vnd.geo+json application/vnd.ms-fontobject application/x-font-ttf application/x-web-app-manifest+json application/xhtml+xml application/xml font/opentype image/bmp image/svg+xml image/x-icon text/cache-manifest text/css text/plain text/vcard text/vnd.rim.location.xloc text/vtt text/x-component text/x-cross-domain-policy image/jpeg video/quicktime audio/mp4 audio/mpeg;

        location / {
                #common
                proxy_set_header    X-Real-IP           $remote_addr;
                proxy_set_header    X-Forwarded-For     $proxy_add_x_forwarded_for;
                proxy_set_header    X-Forwarded-Proto   $scheme;
                proxy_set_header    Host                $host;
                proxy_set_header    X-Forwarded-Host    $host;
                proxy_set_header    X-Forwarded-Port    $server_port;

                proxy_pass  http://12.6.12.6:8090;
        }
}
You may also be interested in
Interested in Cloud Storage?
You can learn more about object storage in general below:
- Amazon Web Services (AWS) Simple Storage Service (S3)
- DigitalOcean Spaces Object Storage
- Google Cloud Storage
- Linode Object Storage
- Microsoft Azure Blob Storage
- Wasabi Hot Cloud Storage
Sources:


Hello ,
Thanks for your great post. I followed this guide uptill the Nextcloud installation page but the MYSQL was throwing errors and I hit a road block.
I will appreciate your help perhaps pay to fix this remotely.
Happy to see that you like my guide. Let me know the error you are getting and provide perhaps some screenshot.
I will email you will my contact details.
Hi
Is there a way to make it primary AFTER installation?
not everyone was aware of wasabi prior to installing and using nextcloud
Thanks for your comment! The data storage structure between file and object stores are very different. When an object store is used as primary storage: no names, directory structures, etc are stored in the object-store. In fact, the bucket only contains objects with names like this: urn:oid:100018. The metadata is only stored in the database and the object store only holds the file content by a unique identifier.
Due to these big difference, I replicated my NextCloud instance with the new config, proved the functionality, then moved the files over onto the new install.
The process took me a while since I had to contend with server-side encryption. You really want to run the new instance side-by-side, due to performance differences etc. The short answer is that I am not aware of an easy way to switch from one to the other. ☹
In this case, the integrity of the data is was vital, so I took my time. Also, note that you need an excellent DB setup when using S3. If you lose your DB, you lose your data.
Great detailed tutorial! I made my deployment using Kamatera VPS put the MySQL on a container on the same server and configured wasabi as primary storage, performance wyse is quiet good. Now I need to enable https
Thanks Rodrigo! Since you using containers, why not try to use ‘linuxserver/letsencrypt’? It’s super easy to work with an auto-renews your cert. I preferred to use AWS RDS due to my current setup. Make sure you have a good backup strategy and test your backups. Enjoy! 🙂
Do you have a recommendation on backup?
Not sure at the moment where exactly I would start 🙂
It’s always good to follow the 3-2-1 principle.
3) — Have at least three copies of your data.
2) — Store the copies on two different media.
1) — Keep IT safe with one backup copy offsite.
In my case –
I use Wasabi. Wasabi’s durability is 11 x 9s, the same as Amazon S3. To put that in context, if you have 10,000,000 objects stored with Wasabi, then 11 x 9s of durability translates into 1 lost file every 10,000 years. Wasabi achieves this by following these rules.
I had failures previously hosting my own MySQL and then faced issues with corrupted MySQL files, and the backups were 12 hours old, and doing live backups were not doing so well, and…
Eventually, I took the lazy way out and signed up for an AWS RDS database and it saved me twice. It’s pricey though, but I could justify it due to all the projects I run.
I would suggest doing this:
– Make sure you back up your database as often as you can. I do mine via a bash script.
– Make sure you take snapshots of your database often.
– MOST IMPORTANT!!!! Test a database restore every so often. Sometimes the backups have problems themselves. The UTF8MB4 encoding does add a bit of fun at times. 😉 For the record – I turned the mine to UTF-8.
– I use Wasabi S3 as my storage provider, so I am pretty happy with that. But you can use rclone or RESTIC to back up from S3 to a local NAS.
Hi! I’m using nextcloud with local S3 (minio) in k8s. For sometimes I see problems with CSS while loading main page. I reported it in issue here https://github.com/nextcloud/server/issues/22250 but still no answer.
3 pods with nextcloud with common NFS for config
S3 as primary
Redis cluster (redis-ha with sentinel)
PerconaDB (3-5 pods) with maxscale as balancer
Can’t find, what is the rpoblem, why I often see CSS problem. Have you any idea?
Hi Anto,
We are configuring our nextcloud with wasabi. But the files on the wasabi are being saved with ‘urn:oid’ format. It seems like it is changing the file type. Is there a way to keep the original file format intact?
Hi Krishna!. That’s how S3 works on NextCloud. The database keeps track of the files and the filenames are small on purpose to increase lookup speed in the S3 shards.
Basically, you need to keep the database backed up every night or you can lose all of your data.