Learn to navigate Linux like a pro using these commands! Linux isn’t just for seasoned sysadmins, and it is not as scary as it seems. You may already know that Linux has many commands. You do, however, only need to know a few commands to get along.
Linux is an entire family of Unix operating systems based on the Linux Kernel. You will find that these operating systems are also known as distributions (or distros). And, you will undoubtedly know one of these popular distros: Ubuntu, Debian, Arch, Fedora, and Mint, to name just a few.
If you were wondering, the list below is technically a mix of Linux and GNU Core Utilities. Which-is-which is beyond the purpose of this guide, but feel free to read more about it here. The GNU Core Utilities is free software that makes it easier to work with Linux. Click here to see the source code behind these utilities.
Table of Contents
CD (Change Directory)
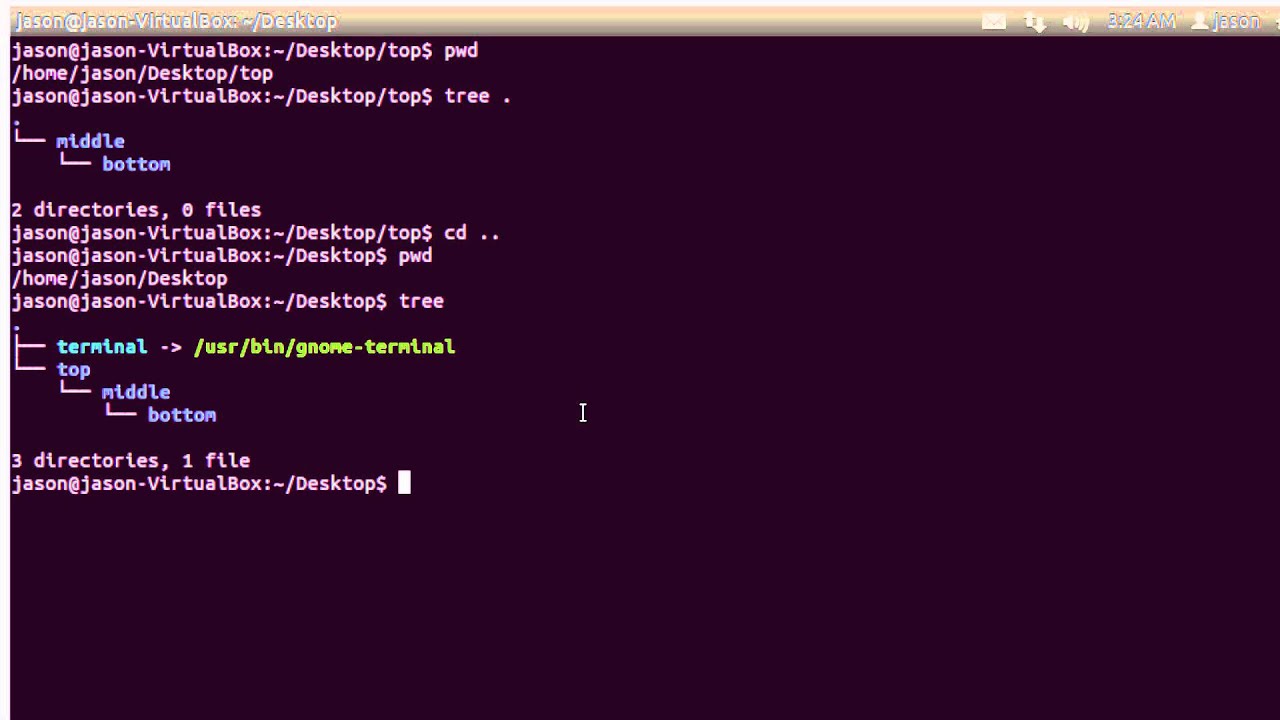
The cd command is vital to navigating the Linux platform. It can be used by any user, whether you’re an administrator or a regular user.
cd command:
cd /directory/subdirectoryThe cd command will change your current working directory to /directory/subdirectory.
Use the following command to switch back to the parent directory:
cd ..Now use the following command to go directly to the home directory:
cd ~LS (List)
The ls Linux command is probably the most used. You use the ls command to list all the directory contents, but that’s not all. You can pair it with other commands to view hidden files, sort files, etc.
ls command:
lsThis command gives you the names of all the files residing in your directory. However, it does not provide you with metadata about the files, such as type, size, etc.
ls -l command:
localhost:~# ls -l
total 16
-rw-r--r--    1 root     root           114 Jul  6 03:47 bench.py
-rw-r--r--    1 root     root            76 Jul  3 19:15 hello.c
The “ls -l” command gives you a list with extra details about the directory contents. For example, the resultant list includes the: modified date, size, time, owner name, owner permissions, and file name.
ls -a command:
localhost:~$ ls -a
.             ..            .ash_history  .screenrc     .xsession     sample1       sample2
You use the “ls -a” command to view all the hidden files. It displays a list of all the files, including hidden files. The files starting with a ‘.’ are used to identify hidden files.
ls -lh command:
localhost:~# ls -lh
total 16K
-rw-r--r--    1 root     root         114 Jul  6 03:47 bench.py
-rw-r--r--    1 root     root          76 Jul  3 19:15 hello.c
The “ls -lh” command is slightly different from the “ls -l” command. It outputs all the files and their details in a human-readable format. The visible change is the changed format of file size.
ls -r command:
localhost:~# ls -r
readme.txt  hello.js    hello.c     bench.py
The “ls -r” command is a simple command that outputs all the files and directories in reverse. The reverse order is based alphabetically.
ls -R command:
localhost:/# ls -R
.:
bin    etc    lib    mnt    proc   run    srv    tmp    var
dev    home   media  opt    root   sbin   sys    usr

./bin:
arch            df              gzip            mkdir           ps              stty
ash             dmesg           hostname        mknod           pwd             su
The “ls” command lists the names of the directories. However, it does not display subdirectories. Instead, the ls -R command is used to view all subdirectories.
ls -lS command (lowercase l, uppercase S):
localhost:/# ls -iS
total 52
drwxr-xr-x    4 root     root          2240 Aug  8 07:38 dev
drwxr-xr-x    2 root     root          1998 Jul 12 08:34 bin
drwxr-xr-x    2 root     root            37 May 30 00:20 opt
dr-xr-xr-x   12 root     root             0 Aug  8 07:38 sys
This command is helpful if you wish to find which directory has the largest file size. It lists out all the directories in the order of largest file size to smallest.
MKDIR (Make Directory)
You use the mkdir command to make single or many directories. You can also set permissions for each directory you create. Remember that not every user has permission to create directories. Therefore, you must have the correct privileges before you create any directory, or you’ll receive a “permission denied” error.
mkdir directory_name command:
mkdir SampleExecuting this command will create a folder named “Sample” in the current directory.
mkdir {dir1,dir2,dir(n)} command:
mkdir {sample1,sample2,sample3,sample4}To save you some time, you also have the option to create many directories at once. Use the code above to create as many directories as you want at once. After mkdir, enter the names of directories in curly brackets, separated by a comma. Executing the command will create all the directories at once in your current directory.
RM (Remove)
You can use the rm command to delete directories or files. Note, however, that you can’t get the file back once you delete it. There are ways to delete files and folders recursively, but let us stick to the basics first.
rm file_name command:
rm tax.txtWhen we execute the rm command without any options, it doesn’t prompt the user and deletes directories by default. You must have permission to the parent directory to execute this command. Here when we execute this command, the file named “tax” is deleted forever. You can use any file name if it exists.
rm file1 file2 file(n) command:
rm tax.txt finance.txt accounting.txtYou can delete many files at once by typing the space-separated file name after the rm command. For example, we are deleting the files “tax, finance, and accounting” at once. The terminal will delete them forever without prompting.
You can also watch this excellent video for more tips on deleting files and folders:
PWD (print working directory)
The pwd Linux command prints out the current working directory.
pwd command:
localhost:~$ pwd
/home/anotherUser
This simple command returns the current working directory. For different users, it displays a different directory. In addition, it shows the directory at which the user is currently present.
pwd -L command:
localhost:/home$ pwd -L
/home
The pwd -L command prints the value of pwd if it names the current working directory.
pwd -P command:
localhost:/home$ pwd -P
/home
You use the “pwd -P” command to print the physical directory without any symbolic links. It avoids all symbolic links.
CAT (Concatenate)
The cat command concatenates different files. For example, the cat command allows you to create a view that contains a file, single file, multiple files, redirect output in files, and concatenate files.
The general syntax for the cat command is:
cat [option] [file]First, we’ll be creating files using the cat command.
cat >sample command:
cat >any_file_nameAfter this terminal will wait for you to enter some data. Type in some text or number and press Ctrl + D together. You will then write your text into your new named file. Do this again with another file name. For example, suppose you have created two files named sample1 and sample 2.
Now let’s see how we can view the contents of the file.
Cat file_Name command:
localhost:~$ cat sample1
This is some text
This command displays the text or data stored in the file.
Now suppose you wish to view data of multiple files:
localhost:~$ cat sample1 sample2
This is some text
This is some text
First, write the names of your file separated by a space. The terminal will then output the content of files in the requested order.
You also have the option to view the contents of a file in a numbered list format. For example, use the following code, and all the contents returned will be in a numbered sequence:
cat -n file_nameWith the cd command, you also have the power to copy contents from one file into another. Keep in mind that copying data from one file into another overrides the data. Create two different files. Now we’re going to show you how to copy data from file1 into file2.
Cat Piping
cat file1 > file2Replace file1 with the name of the file whose content you want to copy, and replace file 2 with the destination file’s name. File1 will overwrite the data on file2.
Now, what if you want to keep the contents of a file and copy data into the same file? The ‘cat file1 > file2’ command does not allow you to append data. Don’t worry. There’s another command which allows you to append data to the destination file. Use the following command:
cat file1 >> file2This command will append all of the data from file1 into file 2.
CP (Copy):
The cp command is one of the most used commands in Linux. You can use the cp command to copy a file, many files, or even directories. In this post, we’ll teach you how to use the cp command for files and directories.
cp file1 file2 command:
cp source_file destination_fileYou must have a source file filled with data from where you wish to copy. A destination file is not necessary. If a destination file exists, the command will override its existing data. If the destination file does not exist, the command will first create the file and then copy the data into it.
cp file1 file2 file(n) directory command:
cp sourcefile1 sourcefile2 sourcefile3 DocumentsThe abovementioned cp command will copy all three files into the directory Documents.
cp -R source_dir destination_dir command:
cp -R Documents TestSometimes you may need to copy a whole directory into another. This command will copy all the contents of a directory to another directory. For example, the documents directory and its contents will be copied to the Test directory when you run this command.
MV (Move)
Now it’s time to learn how to move directories and files around. Mv stands for the move, and this command moves files and directories from one place to another in Linux. It serves another function. You can also rename a file with the mv command. Let’s look into how you can use this command.
mv old_name.txt new_name.txt command:
mv tax.txt record.txtYou can use the mv command in this sequence to rename a file. Here we are renaming the file called “tax” to a new name, “record.” This command doesn’t rename a file, but rather it moves the old file and renames it as the new file under the same directory. Now you’ll find “record.txt” under your current directory.
mv file_name directory_name command:
mv test.txt DesktopIf you wish to move a file to a particular directory, then follow the above command. Use the mv command followed by the file’s name you wish to move and then write the directories name to move the file. Here we are moving the file names “test” to the directory called Desktop.
GREP (Global regular expression Print)
You may have a file with hundreds of entries in it. If so, you may need to search for a specific keyword, sentence, name, number, etc. The grep command comes in. You can use the command to search for a string of characters in any file. It finds the string and outputs all the lines containing that string. The string or term you search for is called regular expressions. Let’s look at how you can use this command.
grep -i “pattern” file_name command:
grep -i "password" bank.txtHere we are searching the file name bank.txt for a term called “password.” The grep command will print out all the lines that contain the word “password” in them. The -i is used for a case insensitive search.
grep -c “pattern” file_name command:
grep -c "debit" tax.txtSometimes you may need to know how many times a word occurs in a file. For example, we can count how often you use the word “debit” in the tax.txt file. However, the command will only output a digit of how many times “debit” appeared in tax.txt.
grep -l “pattern” file1 file2 file(n) command:
grep -l "How to do taxes" bank.txt tax.txt intro.txtThe -l option will display all the files that contain an expression. For example, here, we are searching for a sentence in three different files. The command will output the names of all the files where it could find the sentence.
KILL
There may arise a situation where a process becomes stuck, and you need to force close it. In this case, you can use the kill command. The kill command terminates a process. Let’s look at how to do so.
kill PID (Process ID) command:
kill 1603You can use this command to stop a process. All you have to do is enter the process’s PID. You can find the PID by using the ps command. As per our example, the kill command will terminate PID 1603.
SU (Substitute User)
Like windows, there can be more than one user using Linux. All of them have different rights to access data. There is a single superuser who can access all the data, and then there are sub-users. At any time, you can switch between users using the su command.
su user_nameReplace user_name with the name of the user to who you want to switch. If the user is associated with a password, you’ll need to enter its respective password to gain access. However, using this command has a problem. The user switches with this command but retains the environment from the original login user. Thus, the switched user can’t access files as they belong to the initial user.
To switch user as well as the environment, use any of these commands:
su user_name
su -l user_name
su --login user_name
They all have the same functionality and will require you to enter the password related to that user.
sudo (Substitute User, Do)
You know that there are different users with different privileges and access rights. For example, the root user has the highest privileges. And, sometimes, you need to execute commands as root or another user. The sudo command allows you to do this. Sudo stands for “substitute user, do”. In other words, you switch to another user like root and then do the command.
Remember when you run a program as an administrator in Windows OS? The sudo command is it’s equal, generally speaking. Any user with fewer rights can execute a command as a root user with the sudo command in a nutshell. Let’s look at some examples.
Note that not all users are allowed to use sudo. Users need to be added to the sudo group to grant them sudo permissions.
sudo -l command:
root@server:/var/log# sudo -l
Matching Defaults entries for root on merlin:
    env_reset, mail_badpass, secure_path=/usr/local/sbin\:/usr/local/bin\:/usr/sbin\:/usr/bin\:/sbin\:/bin\:/snap/bin

User root may run the following commands on merlin:
    (ALL : ALL) ALL
The sudo -l command allows you to see what root commands you can execute.
sudo !! command:
sudo !!Using the “sudo !!” command allows you to execute your previous command.
sudo -u [user] [command]
sudo -u Anthony [command]The sudo -u command allows you to run a command as another user; in this case, it is: Anthony. The command option indicates the command you want to run as another user.
sudo su command
sudo suUse sudo su if you want to switch to the root account.
sudo command
sudo [command]The sudo command without -u allows you to run your command as the root user. The command option indicates the command you want to run as another user.
sudo vs. su –
You have an idea of what the Sudo and Su command is, but what is the difference? S
When you execute su, it switches to the root user. You are required to enter the Root user’s password to switch to the root user. One more thing to keep in mind is that the environment remains the same with su command. It doesn’t change to the root’s environment.
There’s a variation of the su command that is “su -. “This command also switches the user to the root user but also creates a new environment. The rest is the same. Using this command is beneficial as you don’t have to log out and then re-login as the root user.
Some differences:
- With the sudo command, you can only run a single command. To run more commands, you have to use the sudo command. The su – command creates a new environment, and you can execute any number of commands you want.
- When you use the sudo command, you have to type in the current user’s password. When you use su – command, you have to type in the root user’s password.
- You can trace a user when they execute a command using sudo. But, you can’t trace the user when they use su – command.
- There is no limit for the user’s when using the su – command. They can run any command they want. With the sudo command, users can be limited to what commands they can run and what they can’t.
History
The bash shell stores a history of executed commands by different users. You use the Linux history command for audit purposes or to view which commands you used. The syntax is super simple. Just type ‘history’.
history command:
localhost:~$ history
   0 ls
   1 su anotherUser
   2 su -l anotherUser
   3 cat /etc/passwd
   4 su user2
Executing this command will print out a list of all the commands you previously executed in a numbered form.
In some cases, different users execute numerous commands. It becomes a hassle to search through the whole list. You can use a command to view the history of commands, one page at a time. This command allows you to traverse through commands by pressing the space bar to view the next page or using the down arrow key to view one command at a time.
Input the following command:
history | lessSometimes you don’t want the whole list of commands. You just want the last few executed commands. To view the list of the last ten commands, use the following code:
history | tailFinally, to view the list of the last 25 executed commands, use the following code:
history 25How to view the time and date of commands
Sometimes you may need to view the date as well as the time for commands. For example, you can print a list of all the executed commands and their date and time using the following command.
export HISTTIMEFORMAT=' %F %T'How to delete the history of commands
You may want to remove a particular command from history or even delete all of the histories.
if so, then use the following command to delete a particular command:
history -d <line_number>But first, insert the line number where your command resides, which you wish to delete.
Now enter the following Linux command into the terminal to delete the complete history:
history -cID (Identity)
You use the id command to find any user’s effective user id, group information, and supplemental groups.
Running this command will output effective user id, group information, and supplemental groups about the current user.
localhost:~$ id
uid=1001(anotherUser) gid=1001(anotherUser) groups=1001(anotherUser)
id [AnotherUser]
To view data about another user, use the following command:
localhost:~$ id root
uid=0(root) gid=0(root) groups=0(root),0(root),1(bin),2(daemon),3(sys),4(adm),6(disk),10(wheel),11(floppy),20(
dialout),26(tape),27(video)
CHOWN (Change Owner) & CHMOD (Change Mode)
You may be dealing with files of different users. One user does not have permission to use the files of another user. Only the administrator can access the file of all the users. Ownership of a file belongs to the user who created it. Here, we will teach you how to copy ownership and permissions of one file to another. Before that, let’s discuss some basics. But read our post called: Basics of Using chown and chmod Commands if you want more detailed information.
Let’s look at how to view ownership and permissions of files.
Say you wish to view permission and ownership of a particular file name sample2. Use the following command to do so:
ls -l sample2This command will display who has permissions and ownership to the particular file.
How to copy ownership:
To copy ownership of a file to another file or multiple files, we use the chown command. In the code, we use a –reference switch with the following syntax.
chown --reference=main_file fileHere the –reference acts as a switch. First, instead of main_file, type the file name of which you want to copy ownership. Next, replace it with the file name you want to transfer ownership to instead of a file.
The result will be that owner of the main_file will be copied to the file.
To copy ownership to multiple files, use this command:
chown --reference=main_file file1 file2 file3How to copy permissions:
If you wish to copy one file permissions to another, you have to use the same –reference switch chmod command. One from where you want to copy permission, and one file where you want to copy permissions. Use the following syntax.
chmod --reference=main_file fileReplace the main_file with the original file from where you want to copy permission. Then, finally, replace the file with the file name where you want to copy permissions to.
The command will then copy the permissions from main_file to the file.
REBOOT
Reboot command in Linux does what a Restart command does in Windows. It shuts down the system and restarts it. There are many reasons why you would need to use this command. After installing significant updates, you need to reboot the system. The system needs rebooting to make the user’s changes effective on a server. Keep in mind that not every user has the ability to reboot the system. You must have root access or enough privileges. With the command-line interface, you can restart your system with a straightforward command. Let’s look at how.
reboot command:
sudo rebootBefore you execute the following command, make sure you’re a root user or have permission to use the command. Next, type in the command and hit enter. Your system will close, and after a few seconds, it will start again.
Root users can use the “sudo reboot” command. This command will execute the reboot command as a root user. First, the terminal will ask for the root’s password. After entering the password, hit enter to reboot your system.
TAIL
This simple command is used to output the last part of any file. Simply speaking, the tail command prints the last few lines. It can be used by default or paired with an option. When you use the tail command without any options, it outputs the last ten lines of the specified file.
Tail is a very versatile command. You can specify how many last lines you wish to print. The tail command can also print all the lines after a specified line number. You can print the last characters and even print the last parts of many files. Let’s look at examples to understand this command better.
tail file_name command:
tail names.txtLike we stated before when we use it without options, it returns the last ten lines. Here, the command will do the same by returning the last ten lines of file “names.”
tail -n file_name command:
tail -3 names.txtWhat if we want to output three or four or however many lines? In this case, we can use the -n option. Just replace -n with any number such as -3. Upon execution of this command, the terminal will print the last three files from “names.”
tail -f command:
tail -f names.txtNow let’s look at the ‘follow’ option paired with the tail command. This option will continuously return the last ten lines of the file. This command runs forever, and you have to use the interrupt key to abort the command. The command will also inform you if the file decreases in size.
SERVICE
Let’s start with the basics. A service is a program that functions in the background. We are interested in using basic commands such as start, stop, and restart for services. Services can also be called daemons. These services or daemons are stored under /etc/init.d.
In a nutshell, the service command is a service manager. In the latest distros, the developers have changed the command to systemctl. But, don’t worry; the service commands also work as it is redirected to systemctl command automatically. Let’s look at examples to understand this command better.
service service_name start command:
service myService startThe syntax to start any service is very straightforward. Type in the $service command followed by the name of the service you want to start and the end type “start.” Here we are starting the ‘myService’ service. Executing the command will not display anything but the service ‘myService’ will start in the background.
service status service_name status command:
service myService statusWe have learned how to start a service, but how will we know if it has started or not? We can know its status using the status option. For example, executing the above command will output whether the service is active or inactive.
Wrapping up
Remembering all these Linux commands takes time, but you will survive if you keep to the basics.


rm?
Thanks for requesting more! Added rm and also a handy video guide.
Greetings from Belgrade.
tail -f is absolutely missing 😉
Most of these commands are not Linux commands else GNU commands please be specific.
You are absolutely right. 🙂 As such, I added some blurb alluding to this for more advanced users.
You are right! I added content about tail -f. Thanks for letting me know.