The Synology NAS DiskStation provides a wide variety of tools in its package center. These tools are useful but can sometimes be restrictive. Luckily, the Synology NAS DiskStation is highly configurable! Let’s see how you can backup data using Rclone from your Synology NAS with an automatic Cron script.
We will do this by using SSH on the Synology NAS to install Rclone. We will then configure our Synology NAS to run a Cron job (or a task using a user-defined script).
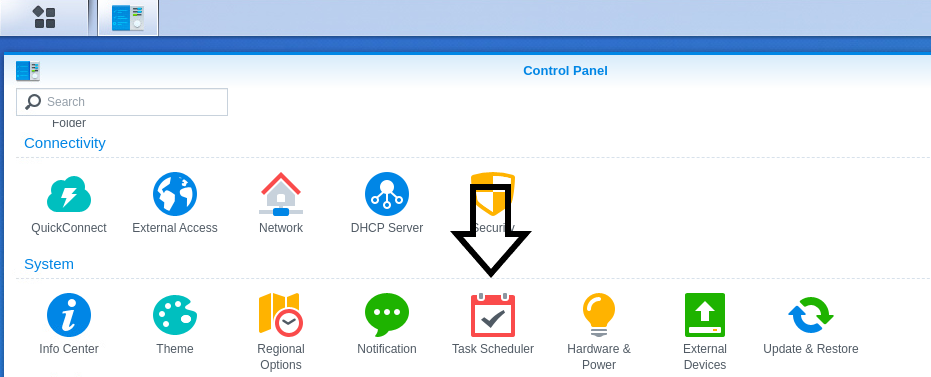
Table of Contents
Background
The 3-2-1 backup rule is a revered and time-honored backup strategy. It states that you must at all times have three copies of your data (including prod). In addition, you must use at least two different media types, such as SSD and S3. And, you must keep one copy of your data offsite.
As such, depending on your need, you can use Rclone to backup data from a variety of data sources and store the data on your local Synology NAS.
For example –
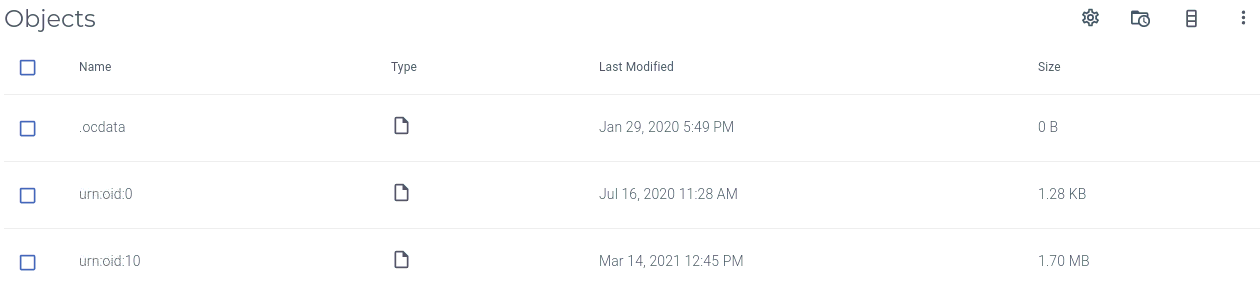
NextCloud, an open-source Cloud-based file storage solution, can store files in an S3 bucket. It does this by using a URN:OID naming convention. Also, some backup apps on the Synology NAS prefer a more traditional file name and extension format. As a result, due to the restriction of file inclusion and exclusion patterns, you cannot use the Synology NAS apps to download NextCloud.
What is Synology NAS DiskStation
The Synology NAS DiskStation is a storage server designed to help you manage your digital assets across your home and office. It uses an intuitive web-based operating system, automatically implements RAID, does disk health checks, and recovers from a disaster.

What is Rclone
Rclone is a command-line program to manage files on Cloud storage. It is feature-rich and supports over 40 cloud storage products, including S3 object stores, business & consumer file storage services, and standard transfer protocols like FTP.
Users call Rclone “The Swiss army knife of cloud storage” and “Technology indistinguishable from magic”.

What are Cron jobs/user-defined scripts
As per Wikipedia: The software utility cron, also known as a cron job, is a time-based job scheduler in Unix-like computer operating systems. Users who set up and maintain software environments use cron to schedule jobs to run periodically at fixed times, dates, or intervals.
Synology NAS refers to Cron jobs as a scheduled task, and you have a few types available via the DiskStation Manager (DSM). We will be using a scheduled task to run a user-defined script. You will have a few configuration options available to you, such as task name, user id to run the Cron job, the Cron schedule you want to use, and the actual script you want to use.
Something to note is that you cannot access the Cron via the usual crontab -e command. To edit the Cron directly:
First, you must become root:
sudo -iThen, you can edit the Crontab file:
nano /etc/crontabFinally, you can restart the Cron like this:
synoservice -restart crondBefore we get started
You will need to ensure that you have a data source (called a remote) with credentials for Rclone to access. The example below will use IAM credentials for a bucket stored with Wasabi S3. Rclone supports other connections, and you could also use FTP if S3 is not for you. For the Synology, you will need root and SSH access. You will also need to set up a shared folder.
How to enable SSH access
To enable SSH access on your Synology NAS:
- Log in to the Synology NAS.
- Then, navigate DSM Control Panel > Terminal & SNMP > Terminal.
- Finally, tick Enable SSH service.
How to install Rclone
Run the following commands once you are connected via SSH to your Synology NAS.
First, you will need to get root access:
admin@mynas:/$ sudo -i
Password:
root@mynas:~#
Next, you will need to download the Rclone install script and set permissions:
wget https://rclone.org/install.sh | chmod +x install.shFinally, you must install Rclone:
./install.shAdd a remote to Rclone
First, you need to configure a remote:
root@mynas:~# rclone configAs mentioned previously, this example will show the steps to connect to a Wasabi S3 bucket using IAM credentials. You may decide to use a different configuration, such as FTP.
Next, you enter n to add a new remote and enter a name for the remote:
n) New remote
d) Delete remote
r) Rename remote
c) Copy remote
s) Set configuration password
q) Quit config
n/s/q> n
name> WasabiS3
Then, you enter 4 and choose Amazon S3 Compliant Storage Provider (AWS, Alibaba, Ceph, Digital Ocean, Dreamhost, IBM COS, Minio, etc.).
Type of storage to configure.
Enter a string value. Press Enter for the default ("").
Choose a number from below, or type in your own value
 1 / 1Fichier
   \ "fichier"
 2 / Alias for an existing remote
   \ "alias"
 3 / Amazon Drive
   \ "amazon cloud drive"
 4 / Amazon S3 Compliant Storage Provider (AWS, Alibaba, Ceph, Digital Ocean, Dreamhost, IBM COS, Minio, etc)
   \ "s3"
...
...
Storage> 4
** See help for s3 backend at: https://rclone.org/s3/ **
Next, enter 9 and choose to set your S3 provider to Wasabi Object Storage:
Choose your S3 provider.
Enter a string value. Press Enter for the default ("").
Choose a number from below, or type in your own value
 ...
...
 8 / Netease Object Storage (NOS)
   \ "Netease"
 9 / Wasabi Object Storage
   \ "Wasabi"
10 / Any other S3 compatible provider
   \ "Other"
provider> 9
Finally, you complete the questions for your connection. See the example below:
Get AWS credentials from runtime (environment variables or EC2/ECS meta data if no env vars).
Only applies if access_key_id and secret_access_key is blank.
Enter a boolean value (true or false). Press Enter for the default ("false").
Choose a number from below, or type in your own value
 1 / Enter AWS credentials in the next step
   \ "false"
 2 / Get AWS credentials from the environment (env vars or IAM)
   \ "true"
env_auth> 1
AWS Access Key ID.
Leave blank for anonymous access or runtime credentials.
Enter a string value. Press Enter for the default ("").
access_key_id> EXAMPLE00005ITL51VEGC
AWS Secret Access Key (password)
Leave blank for anonymous access or runtime credentials.
Enter a string value. Press Enter for the default ("").
secret_access_key> EXAMPLEzvsdgeedagagdfEGC
Region to connect to.
Leave blank if you are using an S3 clone and you don't have a region.
Enter a string value. Press Enter for the default ("").
Choose a number from below, or type in your own value
 1 / Use this if unsure. Will use v4 signatures and an empty region.
   \ ""
 2 / Use this only if v4 signatures don't work, eg pre Jewel/v10 CEPH.
   \ "other-v2-signature"
region> us-west-1
Endpoint for S3 API.
Required when using an S3 clone.
Enter a string value. Press Enter for the default ("").
Choose a number from below, or type in your own value
 1 / Wasabi US East endpoint
   \ "s3.wasabisys.com"
 2 / Wasabi US West endpoint
   \ "s3.us-west-1.wasabisys.com"
 3 / Wasabi EU Central endpoint
   \ "s3.eu-central-1.wasabisys.com"
endpoint> 2
Location constraint - must be set to match the Region.
Leave blank if not sure. Used when creating buckets only.
Enter a string value. Press Enter for the default ("").
location_constraint>
Canned ACL used when creating buckets and storing or copying objects.

This ACL is used for creating objects and if bucket_acl isn't set, for creating buckets too.

For more info visit https://docs.aws.amazon.com/AmazonS3/latest/dev/acl-overview.html#canned-acl

Note that this ACL is applied when server side copying objects as S3
doesn't copy the ACL from the source but rather writes a fresh one.
Enter a string value. Press Enter for the default ("").
Choose a number from below, or type in your own value
 1 / Owner gets FULL_CONTROL. No one else has access rights (default).
   \ "private"
 2 / Owner gets FULL_CONTROL. The AllUsers group gets READ access.
   \ "public-read"
   / Owner gets FULL_CONTROL. The AllUsers group gets READ and WRITE access.
 3 | Granting this on a bucket is generally not recommended.
   \ "public-read-write"
 4 / Owner gets FULL_CONTROL. The AuthenticatedUsers group gets READ access.
   \ "authenticated-read"
   / Object owner gets FULL_CONTROL. Bucket owner gets READ access.
 5 | If you specify this canned ACL when creating a bucket, Amazon S3 ignores it.
   \ "bucket-owner-read"
   / Both the object owner and the bucket owner get FULL_CONTROL over the object.
 6 | If you specify this canned ACL when creating a bucket, Amazon S3 ignores it.
   \ "bucket-owner-full-control"
acl>
You can quit Rclone once you have completed your S3 remote config.
Backup your Rclone remote locally
The basic syntax to sync a remote is:
rclone sync [REMOTE_NAME]:[BUCKET_OR_FOLDER_NAME] [LOCAL_PATH] -vThe remote name is the remote that you configured via rclone config. Then the bucket or folder name is, in this case, the bucket name in the S3 remote we are trying to access. The local path is the location where you want to sync the file too. Adding -v provides a summary of the completed sync.
Run the following command as root to sync your remote with your local shared folder:
rclone sync WasabiS3:MyBucket /volume1/wasabi-s3-local -vExample of sync:
root@mynas:~# rclone sync WasabiS3:MyBucket /volume1/wasabi-s3-local -v
Transferred:        5.489M / 5.489 MBytes, 100%, 19.485 GBytes/s, ETA 0s
Deleted:                0 (files), 2 (dirs)
Transferred:            1 / 1, 100%
Elapsed time:         3.1s
Sync your remote automatically using a Cron job
The example below will show you how to run your Rclone script automatically as a Cron job. This is the final piece in the puzzle to show you how to backup data using Rclone from your Synology NAS with an automatic Cron script.
To add a user-define task:
- Log in to the Synology NAS.
- Then, navigate DSM Control Panel > Task Scheduler.
- Next click on the create button and then click on scheduled task > user-defined script.
- Then, on the create task window, enter your task name in the general settings tab.
- Next on the schedule tab choose the schedule.
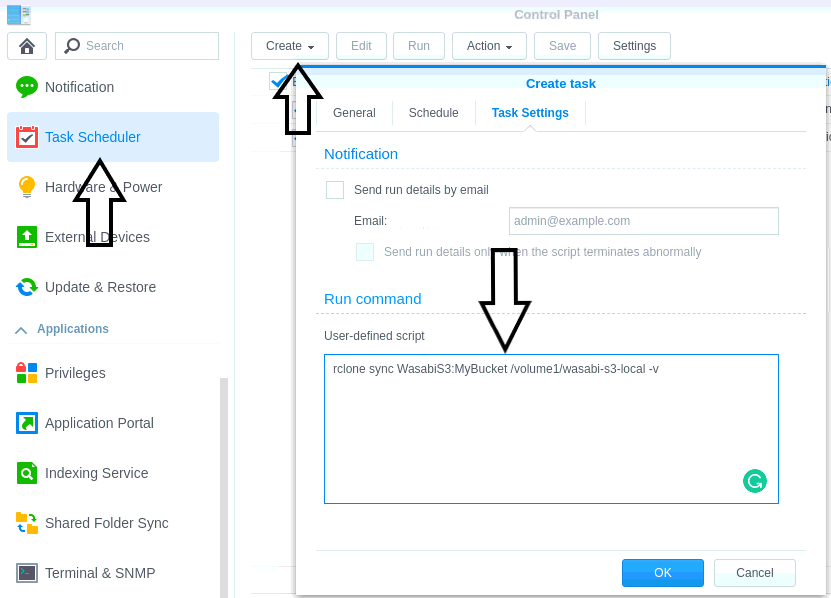
- Finally, on the task setting tab, enter your user-defined script.
See an example below:
You can also enable to email notification feature and get a handy email notification like this:
Task: Backup NextCloud
Start time: Tue, 23 Mar 2021 05:46:49 GMT
Stop time: Tue, 23 Mar 2021 05:48:17 GMT
Current status: 0 (Normal)
Standard output/error:
2021/03/23 05:47:52 INFO  :
Transferred:             0 / 0 Bytes, -, 0 Bytes/s, ETA -
Elapsed time:       1m2.8s

2021/03/23 05:48:05 INFO  : urn:oid:702713: Copied (new)
2021/03/23 05:48:07 INFO  : urn:oid:702712: Copied (new)
2021/03/23 05:48:07 INFO  : urn:oid:702715: Copied (new)
2021/03/23 05:48:17 INFO  :
Transferred:      198.502k / 198.502 kBytes, 100%, 42.142 kBytes/s, ETA 0s
Checks:            423072 / 423072, 100%
Transferred:            3 / 3, 100%
Elapsed time:      1m27.7s
Wrapping up
Now you can backup data using Rclone from your Synology NAS with an automatic Cron script.
Interested in Cloud Storage?
You can learn more about object storage in general below:
- Amazon Web Services (AWS) Simple Storage Service (S3)
- DigitalOcean Spaces Object Storage
- Google Cloud Storage
- Linode Object Storage
- Microsoft Azure Blob Storage
- Wasabi Hot Cloud Storage
You may also be interested in
Sources


Thanks for the nice how to.
A short question, when I trie to use onedrive for my backupdestination there say the rcloneconfig something like 127.0.0:5876/xkdkwksl but the browser doesen’t know the link and I get an error in my firefox.
Have you some solution?
Thank you Auto. I got the inspiration from you, and I took a step forward. I backup my OSS on Alibaba using a private leased line (Express Connect) via internal endpoint. You may refer to my article at https://www.alibabacloud.com/blog/back-up-from-alibaba-cloud-oss-to-your-synology-nas-internally_598906